


In Windows, when you connect to a network via Ethernet or wireless, a prompt appears asking you to choose a “Network Location”.
 Each one of these options will tell Windows to use a different rule set when handling different functions on the network, such as file sharing and what the firewall should be blocking.
In Windows 7 and 8, if you want to change the Network Location, you would do 3 things.
- Go to control Panel.
- Click Network and Sharing Center.
- Then click where your Current Network Location is highlighted. This will then prompt you for a change.

In Windows Server 2012 this link is no longer highlighted. To change your Network Location there are a few extra steps.
- In Server Manager, open the Tools menus and select ‘Local Security Policy’. You will get this window.
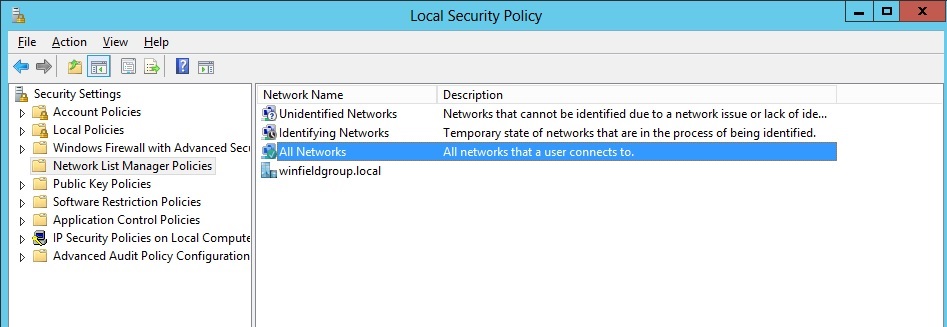
- Select ‘Network List Manager Policies’ in the left console tree.
- Right Click ‘All Networks’ and click Properties.
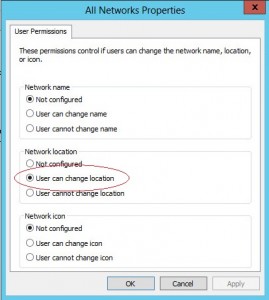 Change the Network Location option to ‘User can change location’.
- Now reboot to apply the changes.
You can also run the gpupdate/force command in an elevated cmd prompt instead of rebooting.
Note: In the ‘Local Security Policy’ console, you can also change the network location by editing the properties of the listed ‘Network’ instead of changing the ‘All Networks’ option. Once there, click on the ‘Network Location’ tab and select a new ‘Location type’.
POWERSHELL
There are those among us who prefer Powershell for tasks like this. Here are the Powershell commands to get and change this information.
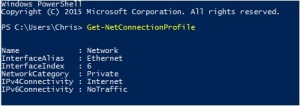
Get-NetConnectionProfile will list the network profiles on your system. You should see something like this:
Set-NetConnectionProfile –InterfaceIndex 6 –NetworkCategory Public will change the ‘Network Location’ in this instance, to Public.